

If you’ve ever looked at your pup and thought, “You deserve a treat as special as you are,” then you’re in the right place. Whether it’s for a birthday, adoption day, or just because, Puppy Frosting Recipes are a fun and easy way to make your dog feel extra loved. These aren’t just any toppings—they’re made with dog-safe ingredients that skip the sugar and focus on flavor, texture, and tail-wagging approval.
In this guide, we’ve rounded up the Top 5 Puppy Frosting Recipes that are simple to whip up at home, vet-approved, and guaranteed to make your pup’s treats look and taste amazing.
From creamy peanut butter blends to yogurt-based frostings with a hint of honey, there’s something for every canine palate. So grab your mixing bowl, roll up your sleeves, and get ready to turn your dog’s snack time into a celebration. Your furry best friend is going to love this!
Top 5 Puppy Frosting Recipes

Looking to take your homemade dog treats to the next level? Whether you’re celebrating your pup’s birthday or just want to make snack time extra special, adding a pet-safe frosting can make tails wag with excitement. Below are five easy and vet-approved frosting recipes your furry friend will love!
1. Cream Cheese Delight Recipe
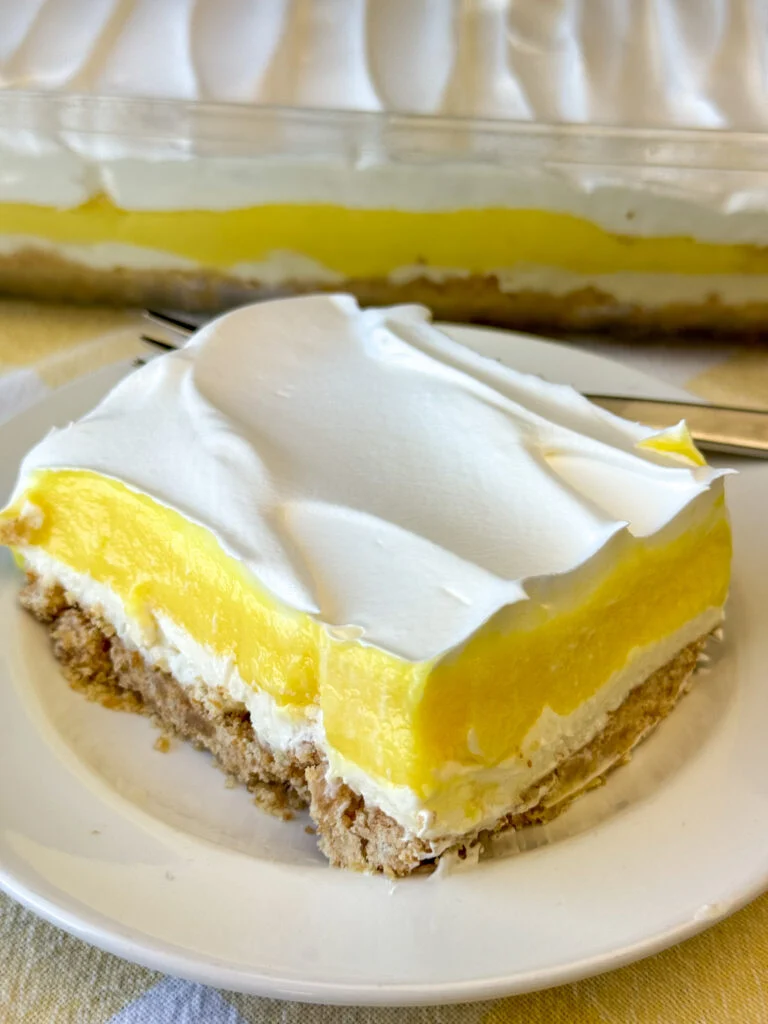
If you’re looking for an easy, delicious, and crowd-pleasing dessert, then this Cream Cheese Delight is exactly what you need. It’s a layered, creamy creation with a buttery crust, a smooth cream cheese filling, rich pudding, and a fluffy whipped topping. Each bite offers a perfect balance of textures and flavors. Best of all, it’s incredibly simple to make—no fancy techniques required!
Whether you’re hosting a holiday gathering, contributing to a potluck, or just treating yourself after a long day, this dessert brings big flavor with minimal effort. It’s also a flexible recipe, which means you can adjust it to suit your favorite flavors or ingredients.
What You’ll Need to Make Cream Cheese Delight
This dessert is built in layers, and each layer requires only a few simple ingredients.
For the crust, you’ll need all-purpose flour, softened unsalted butter, and chopped pecans. The flour and butter create a crumbly, rich base, while the pecans provide a bit of crunch and nutty flavor. If you prefer a softer crust or want to skip the nuts, you can leave them out or substitute with crushed graham crackers.
The cream cheese layer is made with softened cream cheese, powdered sugar, and whipped topping. The cream cheese provides that signature tangy richness, while the powdered sugar sweetens it just right. The whipped topping helps make the layer light and fluffy.
For the pudding layer, you’ll use instant pudding mix and cold milk. You can choose your favorite flavor—chocolate and vanilla are classics, but options like butterscotch or banana work beautifully too. Make sure to use cold milk to help the pudding set quickly and properly.
Finally, you’ll top everything with more whipped topping and a few optional garnishes. Chocolate shavings, chopped nuts, crushed cookies, or a caramel drizzle can add extra flair and flavor, depending on your preferences.
Step 1: Make the Crust
To start, preheat your oven to 350°F (175°C). In a mixing bowl, combine one cup of all-purpose flour with half a cup of softened unsalted butter. If you’re using chopped pecans, add half a cup to the mixture.
Blend the ingredients until they form a crumbly dough. Press the dough evenly into the bottom of a 9×13-inch baking dish to create the crust. Bake for about 15 minutes or until it turns lightly golden. Once done, let it cool completely before adding the next layer.
Step 2: Prepare the Cream Cheese Layer
In a clean bowl, beat an 8-ounce package of softened cream cheese until it’s smooth and free of lumps. Gradually add in one cup of powdered sugar and mix until fully incorporated. Then, gently fold in one cup of whipped topping until everything is light and creamy.
Spread this mixture evenly over the cooled crust. This forms a velvety base that balances the sweetness of the pudding layer.
Step 3: Mix and Add the Pudding Layer
In another bowl, whisk together two boxes (3.4 ounces each) of instant pudding mix with three cups of cold milk. Whisk for 2 to 3 minutes until the mixture thickens. If you’d like to get creative, use one box of chocolate pudding and one of vanilla for a layered look and flavor.
Once thickened, gently spread the pudding mixture over the cream cheese layer, covering it completely.
Step 4: Add the Whipped Topping and Garnish
Now it’s time to add the final touch. Spread about one and a half cups of whipped topping evenly over the pudding layer. Smooth it out with a spatula to create a clean, finished top.
You can stop here, or add some fun garnishes—shaved chocolate, a sprinkle of chopped pecans, crushed cookies, or even a drizzle of caramel sauce. These extras make the dessert visually appealing and even more delicious.
Let It Chill and Serve
Once assembled, cover the dish and refrigerate for at least two hours. This chilling time helps the layers firm up and allows the flavors to meld together beautifully. If you can leave it overnight, that’s even better. When you’re ready to serve, cut into squares and watch it disappear fast!
Cream Cheese Delight is the kind of dessert that feels fancy but is secretly super easy. It’s rich, creamy, and layered with flavors that complement each other perfectly. Plus, it’s easy to tweak to match your mood or the occasion. With just a few ingredients and steps, you’ll have a dessert that’s always a hit—no baking degree required!
2. Peanut Butter Yogurt Frosting Recipe
Looking for a frosting that’s creamy, slightly tangy, and bursting with peanut butter flavor? This Peanut Butter Yogurt Frosting might just become your new favorite topping. It’s rich and decadent like a traditional buttercream but made with Greek yogurt and peanut butter, giving it a healthier twist without sacrificing taste.
Perfect for cakes, cupcakes, banana bread, muffins, or even as a dip for fruit, this frosting is a breeze to whip up. It has just the right amount of sweetness, a velvety texture, and a satisfying peanut butter punch that pairs well with just about anything.
What You’ll Need to Make Peanut Butter Yogurt Frosting
The beauty of this recipe lies in its simplicity. You only need a handful of everyday ingredients that come together in minutes.
You’ll start with creamy peanut butter as the star of the show. It gives the frosting its signature flavor and smooth texture. If you prefer natural peanut butter, make sure it’s well-stirred and not too oily or dry. Regular peanut butter works just as well and tends to give a slightly firmer result.
Next comes Greek yogurt, which provides creaminess and a hint of tang. Use full-fat Greek yogurt for the best consistency—it’s thicker and less likely to turn the frosting runny. Low-fat versions can work, but the texture may be softer.
To sweeten things up, you’ll use powdered sugar. This blends smoothly into the mixture without any grittiness, giving the frosting just the right amount of sweetness. If you want a more natural option, you can experiment with honey or maple syrup, though this may affect the texture.
Finally, vanilla extract is added for a hint of warmth and depth, tying all the flavors together. A pinch of salt can also enhance the flavor, especially if you’re using unsalted peanut butter.
Step 1: Combine the Peanut Butter and Yogurt
In a medium mixing bowl, add half a cup of creamy peanut butter and half a cup of full-fat Greek yogurt. Using a hand mixer or a sturdy whisk, blend them together until the mixture is smooth and uniform. The peanut butter and yogurt should fully incorporate without any lumps, forming a rich and creamy base.
Step 2: Add the Sweetener and Vanilla
Gradually add one cup of powdered sugar to the peanut butter-yogurt mixture. Mix slowly at first to avoid a powdered sugar cloud, then increase the speed as it begins to blend. Add in one teaspoon of pure vanilla extract and continue mixing until everything is fully combined and fluffy. If the frosting feels too thick, add a tablespoon of yogurt to loosen it. If it’s too soft, mix in a bit more powdered sugar to thicken.
Step 3: Adjust the Texture and Flavor
Now’s the time to taste and tweak. If your frosting needs a bit more sweetness, feel free to add a few extra tablespoons of powdered sugar. If you want it saltier or are using unsalted peanut butter, a pinch of salt can really bring the flavors to life. Stir until you reach your desired consistency—thick enough to pipe or spread, but still silky and smooth.
Step 4: Use It Right Away or Chill for Later
This frosting is best used immediately after mixing. Spread it over cakes, cupcakes, muffins, or banana bread for a creamy, nutty finish. If you’re not using it right away, store it in the fridge in an airtight container for up to 3 days. Let it come to room temperature and give it a quick stir before using, as the yogurt can firm up when chilled.
Peanut Butter Yogurt Frosting is proof that you don’t need a ton of butter or sugar to make a dessert topping that’s rich, satisfying, and full of flavor. With just a few simple ingredients and no cooking required, this frosting comes together in a flash and adds a healthy twist to your favorite baked goods.
Whether you’re piping it onto cupcakes or spreading it over banana bread, it’s a delicious way to treat yourself without going over the top.
3. Cottage Cheese Frosting Recipe
If you’re looking for a unique and healthier alternative to traditional frosting, Cottage Cheese Frosting is a fantastic option. This creamy frosting is made from cottage cheese, which not only adds a slight tanginess but also a boost of protein. It’s perfect for those who want to enjoy frosting without the heavy sweetness that comes with most traditional options.
Whether you’re topping off a carrot cake, banana bread, or even a simple muffin, this frosting provides a velvety smooth texture and a subtle, refreshing flavor. Plus, it’s simple to make and can easily be customized with different add-ins to suit your taste. If you’re looking to create a healthier dessert that doesn’t skimp on flavor, this frosting is the way to go.
What You’ll Need to Make Cottage Cheese Frosting
Making Cottage Cheese Frosting is simple, and the ingredients are likely already in your kitchen. You’ll start with cottage cheese, which is the base of the frosting. Make sure to use a smooth variety of cottage cheese (not lumpy) for the best texture. If you prefer a silkier frosting, you can blend the cottage cheese until smooth.
Next, you’ll need powdered sugar to sweeten the mixture. Since this frosting isn’t as sweet as traditional frosting, you can adjust the amount of powdered sugar to your liking. Start with one cup and add more if needed, but remember that a little goes a long way.
For a richer flavor, vanilla extract is added to give the frosting a nice depth. A pinch of salt will also enhance the flavors and balance the sweetness. Finally, you’ll need heavy cream or milk to achieve the right consistency. This is optional, but if you want a slightly smoother and lighter frosting, it helps to thin the mixture.
Step 1: Prepare the Cottage Cheese
Start by draining the cottage cheese well to remove any excess liquid. If you’d like a completely smooth frosting, you can place the cottage cheese in a blender or food processor and blend until smooth. If you prefer some texture in your frosting, you can skip this step and use the cottage cheese as it is. Transfer the cottage cheese to a medium-sized mixing bowl.
Step 2: Add Sweetener and Vanilla
Next, add 1 cup of powdered sugar to the cottage cheese and mix thoroughly until the sugar is fully dissolved. You can adjust the sweetness to taste by adding a little more powdered sugar if you prefer a sweeter frosting. Afterward, stir in 1 teaspoon of vanilla extract for a hint of warmth and richness. This will round out the flavor profile and complement the tanginess of the cottage cheese.
Step 3: Mix Until Smooth and Creamy
Now, mix the frosting well to ensure everything is fully incorporated. If the texture feels too thick, add 1-2 tablespoons of heavy cream or milk to thin it out to your desired consistency. The frosting should be smooth and easy to spread, but not runny. Keep mixing until the consistency is right for spreading over your cake or cupcakes.
Step 4: Adjust the Flavor
Taste your frosting and see if it needs any adjustments. If you’d like more sweetness, feel free to add a little extra powdered sugar. For a richer flavor, you can also add a pinch of salt, which helps to balance out the sweetness and elevate the flavor. Once everything tastes just right, your frosting is ready to go.
Step 5: Use Immediately or Refrigerate
This frosting is best used immediately after preparation. Spread it generously over cakes, cupcakes, or muffins for a light and creamy topping. If you don’t plan on using it right away, you can store the frosting in an airtight container in the refrigerator for up to three days. When you’re ready to use it, allow it to come to room temperature and give it a quick stir to smooth it out.
Cottage Cheese Frosting is a unique, lighter alternative to traditional frosting that brings both flavor and protein to the table. It’s perfect for anyone looking for a healthier dessert topping or those who enjoy a less sugary frosting option. Whether you’re using it to top a carrot cake, banana bread, or simply enjoying it by the spoonful, this creamy frosting offers a refreshing and delicious twist.
4. Potato-Based Frosting
If you’re looking for a frosting that’s unique, creamy, and a little healthier, Potato-Based Frosting could be your new go-to. Yes, you read that right—this frosting uses mashed potatoes as its base! Don’t let the idea of potatoes in frosting surprise you; they’re an unexpected ingredient that makes for a smooth, light, and fluffy topping that’s perfect for a variety of baked goods.
This frosting is a great option for those who want to avoid the traditional butter and sugar frostings, offering a slightly sweet, fluffy texture that’s a bit less rich but just as satisfying. Potato-based frosting is ideal for topping cakes, cupcakes, or even pairing with spiced desserts like carrot cake or pumpkin bread. It’s also a fun way to make your treats a little more unique and memorable.
What You’ll Need to Make Potato-Based Frosting
To make this unique frosting, you’ll need just a few simple ingredients. You likely already have most of them in your kitchen!
Start with boiled potatoes. Use starchy potatoes like Russets, which mash easily and provide a fluffy texture. Make sure to cook them thoroughly and let them cool down to room temperature before using them in your frosting. Avoid overcooking the potatoes, as they can become too watery and affect the frosting’s consistency.
You’ll also need powdered sugar to sweeten the frosting. Powdered sugar is ideal because it dissolves easily, giving the frosting a smooth, non-gritty texture. Butter is added to give richness and creaminess to the frosting, though you can experiment with alternatives like coconut oil or a dairy-free butter substitute if you prefer a vegan option.
Vanilla extract adds a hint of flavor and depth, and a pinch of salt can help balance the sweetness. Finally, milk or cream is optional but will help adjust the texture to your preference. If you want a thinner, creamier consistency, adding a little milk or cream will do the trick.
Step 1: Prepare the Potatoes
Start by boiling the potatoes until they’re tender. You can either peel them beforehand or leave the skins on, depending on your preference. Once the potatoes are cooked, drain them and let them cool completely. It’s important to let the potatoes cool to room temperature before proceeding, as hot potatoes will melt the butter and affect the frosting’s texture.
Once cooled, mash the potatoes thoroughly. You can use a potato masher, a fork, or even a food processor for a smooth finish. Be sure there are no lumps left in the mashed potatoes, as they can affect the final texture of the frosting.
Step 2: Add the Butter and Sweetener
Next, add 1/2 cup of butter (softened) to the mashed potatoes and beat them together until the mixture is smooth and creamy. Once combined, add 2 to 3 cups of powdered sugar to the mashed potatoes. You can adjust the amount of sugar based on how sweet you like your frosting. Start with 2 cups and taste the frosting to see if you’d like to add more.
Step 3: Mix in Vanilla and Salt
Now, stir in 1 teaspoon of vanilla extract for flavor. The vanilla will complement the mildness of the potatoes and add a warm, sweet note. Also, add a pinch of salt to balance the sweetness of the frosting and bring out the other flavors.
Continue mixing until the frosting is completely smooth and no lumps remain. If the texture is too thick for your liking, you can add a tablespoon of milk or cream at a time until you reach your desired consistency. If the frosting becomes too thin, add more powdered sugar to thicken it back up.
Step 4: Adjust and Use
Taste the frosting to see if it needs any adjustments. If you prefer it sweeter, add more powdered sugar. If the frosting is too sweet, you can always add a bit more salt to balance it out.
Once you’re satisfied with the texture and flavor, your potato-based frosting is ready to use. Spread it over cakes, cupcakes, or muffins, or pipe it for decorative designs. The frosting holds its shape well but remains light and airy, making it great for creating elegant cake decorations.
Potato-Based Frosting is a light, unique, and creamy alternative to traditional frostings. It offers the perfect balance between smoothness and sweetness, while its mild flavor lets your baked goods shine. The mashed potatoes provide a silky texture without being overly rich, and the addition of butter and powdered sugar creates a creamy frosting that’s easy to spread or pipe.
Whether you’re looking for a healthier frosting or just something new, potato-based frosting offers a fun and delicious twist on classic dessert toppings. It’s perfect for cakes, cupcakes, or even as a creative topping for pies or muffins.
Would you like to experiment with adding cocoa powder for a chocolate version, or maybe try infusing the frosting with spices like cinnamon or nutmeg for a fall-themed treat? The possibilities are endless with this versatile frosting!
5. Carob Frosting Recipe
If you’re looking for a rich, creamy frosting that’s a little different from the usual chocolate options, Carob Frosting is a fantastic choice. Made with carob powder instead of cocoa powder, this frosting offers a sweet and slightly nutty flavor that’s perfect for anyone avoiding chocolate, caffeine, or simply looking to try something new.
Carob is derived from the pods of the carob tree, and its naturally sweet flavor makes it a great substitute for chocolate in many recipes. It’s also caffeine-free and lower in fat, making it a healthier alternative for your sweet treats. This frosting pairs wonderfully with cakes, cupcakes, and even brownies, offering a smooth, velvety texture that’s sure to impress.
What You’ll Need to Make Carob Frosting
Carob frosting is easy to make with just a few simple ingredients, many of which you likely already have in your kitchen. Here’s what you’ll need:
- Carob powder: This is the star ingredient, replacing cocoa powder in traditional frosting recipes. It has a mild, naturally sweet flavor.
- Powdered sugar: To sweeten the frosting and give it a smooth texture, powdered sugar is key.
- Butter: Butter adds richness and helps create the creamy texture of the frosting. You can substitute with vegan butter for a dairy-free option.
- Vanilla extract: A teaspoon of vanilla enhances the flavor and complements the sweetness of the carob.
- Milk or cream: To adjust the frosting’s consistency, you’ll need a bit of milk or cream. Use your preferred milk (almond, oat, or dairy) for a smooth finish.
The best part? These ingredients are simple, and the result is a luxurious, creamy frosting with a flavor that’s both unique and delightful.
Step 1: Melt the Butter and Mix with Carob Powder
Start by melting 1/2 cup of butter in a saucepan over low heat. Once the butter is melted, add 1/2 cup of carob powder to the pan. Stir continuously until the carob powder is fully dissolved into the butter, creating a smooth, glossy mixture. The carob should be fully incorporated, leaving no lumps behind. This mixture is the base for your frosting and will help deliver that rich, carob flavor.
Step 2: Add Powdered Sugar and Vanilla
Next, add 2 to 3 cups of powdered sugar to the butter-carob mixture. Begin with 2 cups, and if you want a sweeter, thicker frosting, add more to taste. Mix everything thoroughly until the powdered sugar is completely blended into the carob mixture.
Once the sugar is well incorporated, stir in 1 teaspoon of vanilla extract. The vanilla adds depth to the frosting, enhancing the subtle sweetness of the carob and creating a well-rounded flavor.
Step 3: Adjust Consistency with Milk or Cream
Now, you’ll need to adjust the consistency of the frosting. Add 2 to 4 tablespoons of milk or cream (depending on your desired thickness). If the frosting is too thick for your liking, add a little more milk or cream, a tablespoon at a time. If it’s too thin, add a little more powdered sugar to thicken it up.
Stir the frosting well after each addition to ensure it reaches the perfect consistency for spreading or piping.
Step 4: Beat Until Smooth
Once everything is well combined, use a hand mixer or stand mixer to beat the frosting for about 2-3 minutes, until it’s smooth, creamy, and fluffy. This step helps ensure that your frosting is light and airy, perfect for spreading over cakes and cupcakes.
Step 5: Spread and Enjoy!
Once the frosting is ready, it’s time to put it to use! Spread it over your favorite cakes, cupcakes, or brownies. The frosting should have a velvety smooth texture and a rich, slightly sweet carob flavor that pairs beautifully with a variety of baked goods.
If you’re using the frosting to pipe decorative swirls or rosettes, make sure the consistency is just right. If it’s too thick, add a little more milk; if it’s too runny, add more powdered sugar.
Carob Frosting is a delicious and versatile alternative to traditional chocolate frosting. With its naturally sweet and nutty flavor, it’s perfect for those who are sensitive to caffeine or simply want to try something different. This frosting is easy to make and incredibly creamy, providing a delightful topping for cakes, cupcakes, and brownies alike.
What makes this frosting even better is its healthier edge. Carob is lower in fat and caffeine-free, making it an excellent choice for kids, those on special diets, or anyone who prefers a lighter alternative to chocolate frosting.
Experiment with different flavors by adding a pinch of cinnamon, a touch of almond extract, or even a spoonful of peanut butter for a twist. Carob frosting is incredibly versatile and can be customized to suit your taste.
Now that you have this delicious recipe in your back pocket, it’s time to get creative and frost your favorite baked goods with this sweet and unique frosting. Enjoy the creamy, carob goodness with every bite!
FAQs
What Is Puppy Frosting?
Puppy frosting is a special type of frosting made for dogs, often used to top dog-friendly cakes or cupcakes. Unlike traditional human frosting, which can be harmful to pets due to ingredients like sugar and chocolate, puppy frosting is made from safe, pet-friendly ingredients such as peanut butter, yogurt, and mashed sweet potatoes. It’s designed to be delicious for your furry friend while providing a treat that’s healthy and safe for them to consume.
What Ingredients Are Safe For Puppy Frosting?
When making frosting for your puppy, it’s essential to stick to ingredients that are dog-safe. Common ingredients include peanut butter (unsweetened and unsalted), plain yogurt, mashed sweet potatoes, pumpkin puree, coconut oil, and carob powder.
Avoid using chocolate, xylitol, or artificial sweeteners, as these can be toxic to dogs. Always make sure that the ingredients you choose do not contain any harmful additives and are appropriate for your pet’s dietary needs.
Can I Use Regular Frosting for My Puppy?
No, regular frosting should not be used for your puppy. Most standard frostings contain sugar, butter, and ingredients like chocolate or artificial sweeteners, which are not safe for dogs.
Sugar can cause digestive issues, and chocolate contains theobromine, which is toxic to dogs. Always use a frosting specifically made for puppies, with ingredients that are safe and healthy for them.
Can I Make Frosting With Peanut Butter for My Puppy?
Yes, peanut butter is a great ingredient for puppy frosting as long as it’s unsweetened and contains no xylitol. Peanut butter is rich in protein and healthy fats, making it a tasty and nutritious treat for your dog.
When making puppy frosting, simply blend peanut butter with other dog-friendly ingredients like plain yogurt or mashed pumpkin for a creamy, spreadable frosting. Just be sure to check the label for any harmful additives.
How Do I Make Puppy Frosting Without Dairy?
If your dog is lactose intolerant or you prefer a dairy-free option, there are several ways to make frosting without dairy. You can use alternatives like coconut oil or coconut yogurt instead of regular yogurt or butter.
Mashed sweet potatoes or pumpkin puree are also great bases that create a smooth texture and natural sweetness without any dairy. Ensure the ingredients you use are safe and suitable for your puppy’s specific dietary needs.
How Long Does Puppy Frosting Last?
Puppy frosting can typically last up to a week in the refrigerator when stored in an airtight container. If you make a large batch, it’s a good idea to only frost the cupcakes or cakes you plan to serve immediately and keep the rest of the frosting refrigerated until needed.
Always check the frosting for any signs of spoilage (such as unusual smell or texture) before serving it to your puppy.
Can I Freeze Puppy Frosting?
Yes, you can freeze puppy frosting! If you have leftover frosting, simply store it in an airtight container or a freezer-safe bag. When you’re ready to use it, let it thaw in the refrigerator overnight before serving it to your puppy. Freezing your puppy frosting is a great way to preserve it for longer periods and prevent waste.
Can I Add Flavorings to Puppy Frosting?
While you can add flavors to puppy frosting, it’s important to stick with dog-safe ingredients. For a natural boost of flavor, consider adding carob powder (which is a safe, chocolate alternative for dogs), cinnamon, or vanilla extract. Make sure to avoid any artificial sweeteners, alcohol-based flavorings, or ingredients that may be harmful to your dog. Always keep in mind your pet’s allergies and sensitivities when adding extra flavors.
Final Words
Puppy frosting recipes offer a fun and safe way to spoil your furry friend with a delicious, dog-friendly treat. By using wholesome ingredients like peanut butter, plain yogurt, and pumpkin puree, you can create a creamy frosting that’s both tasty and healthy.
Always make sure to avoid harmful ingredients such as chocolate or xylitol and choose safe alternatives tailored to your dog’s dietary needs. Whether for special occasions or as an everyday indulgence, puppy frosting is a great way to show your pet some love.
With these easy recipes, you can ensure your dog enjoys a treat that’s as safe as it is scrumptious. Happy baking for your pup!