

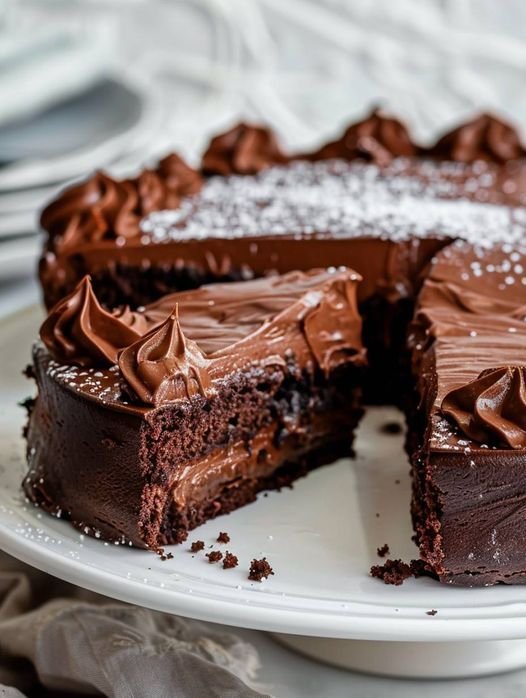
If you’re craving a dessert that feels like a warm hug, then the Hot Fudge Chocolate Pudding Cake is exactly what you need. This decadent treat combines the rich, gooey goodness of hot fudge with a moist, chocolatey cake that practically melts in your mouth.
What makes this recipe so special is its unique pudding-like texture that forms right in the oven, creating a luscious sauce beneath a tender cake layer. It’s an effortless dessert that looks impressive but is surprisingly simple to make—perfect for busy weeknights or last-minute guests.
Whether you serve it warm with a scoop of vanilla ice cream or enjoy it on its own, this Hot Fudge Chocolate Pudding Cake delivers comfort and indulgence in every bite. Get ready to experience chocolate bliss like never before!
Ingredients
Creating the perfect Hot Fudge Chocolate Pudding Cake starts with using the right ingredients. Each component plays a key role in achieving that rich, fudgy texture and deep chocolate flavor that makes this dessert so irresistible.
Dry Ingredients
For the base of the cake, you’ll need all-purpose flour, granulated sugar, unsweetened cocoa powder, baking powder, and a pinch of salt. The flour provides structure, while sugar adds sweetness. Cocoa powder is essential for that intense chocolate flavor, and baking powder helps the cake rise to a light, tender crumb. A bit of salt enhances the overall taste and balances the sweetness.
Wet Ingredients
The wet ingredients include milk, vegetable oil, and vanilla extract. Milk adds moisture and richness, oil keeps the cake tender and soft, and vanilla extract gives a subtle aroma that complements the chocolate perfectly. Using whole milk is best, but you can substitute with your preferred milk if needed.
For the Hot Fudge Sauce
This is the star of the show! You’ll need brown sugar, additional unsweetened cocoa powder, and boiling water. Brown sugar adds a deep, caramel-like sweetness that pairs beautifully with the chocolate. When combined with cocoa powder and poured over the batter before baking, the hot water creates that luscious fudge sauce that pools beneath the cake as it bakes.
Optional Add-Ins
If you want to take this cake up a notch, consider adding mini chocolate chips or chopped nuts to the batter for extra texture and richness. A pinch of espresso powder can also enhance the chocolate flavor without making the cake taste like coffee.
Equipment Needed
Making a delicious Hot Fudge Chocolate Pudding Cake is surprisingly simple, but having the right equipment on hand can make the process smoother and more enjoyable. Here’s what you’ll need to whip up this luscious dessert with ease.
Mixing Bowls and Whisk
Start with at least one medium-sized mixing bowl to combine your dry ingredients, and another for the wet ingredients if you prefer to mix them separately. A whisk is essential for blending everything together smoothly without lumps, especially when mixing the cocoa powder and sugar. If you want, you can also use an electric hand mixer to make the process quicker, but a whisk works perfectly fine.
Measuring Cups and Spoons
Accurate measurements are crucial when baking, so make sure you have a reliable set of measuring cups and spoons. These will help you get the right balance of flour, sugar, cocoa, milk, and other ingredients to achieve the perfect texture and flavor.
Baking Dish
A key piece of equipment for this recipe is a baking dish, ideally a 9×9-inch square or an 8×8-inch ceramic or glass dish. These sizes work well for even baking and allow the hot fudge sauce to form beautifully beneath the cake. Avoid using metal pans if possible, as ceramic or glass retains heat more evenly and helps with the pudding effect.
Oven and Cooling Rack
Your standard oven is, of course, necessary to bake the cake. Preheating it to the right temperature ensures the cake cooks evenly and the fudge sauce develops properly. After baking, a cooling rack is handy to let your cake cool slightly before serving. This helps the fudge sauce thicken a bit, making it easier to cut and serve.
Serving Tools
Lastly, have a spatula or serving spoon ready for scooping out generous portions. A serrated knife can be helpful if you want to slice the cake neatly. Don’t forget a few bowls or plates for serving, especially if you plan to add ice cream or whipped cream on top.
Step-by-Step Instructions
Making a Hot Fudge Chocolate Pudding Cake might sound fancy, but it’s actually pretty straightforward. Follow these detailed steps to get a warm, gooey, chocolatey dessert that’s perfect for any occasion.
Step 1: Preheat Your Oven and Prepare Your Baking Dish
Begin by preheating your oven to 350°F (175°C). While the oven warms up, grab your 9×9-inch baking dish. Lightly grease the dish with butter or non-stick spray to ensure the cake doesn’t stick. This will also help with easy serving later on.
Step 2: Mix the Dry Ingredients
In a medium mixing bowl, combine the dry ingredients: 1 cup of all-purpose flour, 1 cup of granulated sugar, ¼ cup unsweetened cocoa powder, 1 teaspoon baking powder, and a pinch of salt. Whisk these together well to make sure everything is evenly distributed. This step is crucial for a balanced flavor and proper rising of your cake.
Step 3: Add the Wet Ingredients
Next, add the wet ingredients to the dry mix. Pour in ¾ cup of milk, ⅓ cup melted butter, and 1 teaspoon vanilla extract. Stir everything until just combined. You want a smooth batter, but be careful not to overmix, or your cake could become dense.
Step 4: Transfer Batter to Baking Dish
Pour your chocolate batter into the prepared baking dish, spreading it evenly with a spatula. The batter will be relatively thick—that’s perfect because the pudding effect comes from what happens next.
Step 5: Prepare the Hot Fudge Sauce
In a separate bowl, mix 1 cup of hot water with 1 cup of packed brown sugar and ½ cup unsweetened cocoa powder. Stir until the sugar and cocoa dissolve into the water. This mixture will create the rich fudge sauce that sinks to the bottom during baking.
Step 6: Pour Hot Fudge Sauce Over Batter
Carefully pour the hot fudge sauce evenly over the batter in the baking dish. Don’t stir it in; just let it sit on top. As the cake bakes, the sauce will sink down, forming a gooey, fudgy layer beneath the cake.
Step 7: Bake the Cake
Place the baking dish in the preheated oven and bake for about 40-45 minutes. You’ll know it’s done when the top looks set and a toothpick inserted into the cake part comes out mostly clean with a few moist crumbs. The pudding layer underneath will be molten and delicious.
Step 8: Let the Cake Cool Slightly
Once baked, remove the cake from the oven and allow it to cool on a wire rack for about 10-15 minutes. This resting period lets the pudding thicken up a bit, making serving easier and preventing it from running too much.
Step 9: Serve Warm with Optional Toppings
Scoop out portions of the Hot Fudge Chocolate Pudding Cake onto plates or bowls. For an extra indulgent treat, add a scoop of vanilla ice cream, a dollop of whipped cream, or some fresh berries on top. The contrast of warm cake with cold ice cream is simply irresistible.
Step 10: Store Leftovers Properly
If you have any leftovers (though that rarely happens!), cover the baking dish tightly with plastic wrap or transfer pieces to an airtight container. Store in the refrigerator for up to 3 days. Reheat gently in the microwave to bring back that warm, gooey texture before serving again.
Tips and Tricks
Making the perfect Hot Fudge Chocolate Pudding Cake is easier when you know a few helpful tips and tricks. These pointers will ensure your dessert turns out rich, gooey, and absolutely delicious every time.
Use High-Quality Cocoa Powder
The flavor of your cake depends a lot on the cocoa powder you use. Opt for a good-quality unsweetened cocoa powder to get that deep, rich chocolate taste. Avoid substitutes or low-grade cocoa as they can make the cake taste flat or bitter.
Don’t Overmix the Batter
When combining the wet and dry ingredients, stir just until everything is incorporated. Overmixing can develop gluten in the flour, resulting in a dense, tough cake. A few lumps in the batter are okay—this keeps the cake light and tender.
Pour Sauce Gently on Top
The magic of this pudding cake is the hot fudge sauce sinking to the bottom while baking. To achieve this, carefully pour the sauce evenly over the batter without stirring it in. This separation creates the distinct cake and pudding layers.
Use a Glass or Ceramic Baking Dish
Glass and ceramic dishes distribute heat more evenly than metal pans. This helps the cake bake uniformly and prevents burning around the edges. Plus, you get to see the luscious pudding forming through the sides—always a tempting sight!
Let the Cake Cool Before Serving
Though tempting to dig in right away, letting the cake cool for at least 10-15 minutes after baking helps the pudding thicken slightly. This makes serving cleaner and allows the flavors to settle for a richer taste.
Customize Your Toppings
While the cake is amazing on its own, adding toppings like vanilla ice cream, whipped cream, or fresh berries can elevate the dessert to a whole new level. Play around with your favorite toppings to keep it fun and personalized.
Store Leftovers Properly
If you happen to have leftovers, cover the cake tightly and refrigerate. Reheat individual portions in the microwave for a few seconds to restore that warm, gooey texture. Avoid overheating, which can dry out the cake.
Frequently Asked Questions
What Makes Hot Fudge Chocolate Pudding Cake Unique?
Hot Fudge Chocolate Pudding Cake is special because it creates its own rich sauce while baking. The batter is topped with a sugary cocoa mixture and hot water before going into the oven. As it bakes, the cake rises to the top while a warm, gooey fudge layer forms underneath.
This self-saucing effect gives you both a moist chocolate cake and a decadent pudding in one easy dessert, without needing separate components.
Can You Make Hot Fudge Chocolate Pudding Cake Ahead Of Time?
Yes, you can prepare Hot Fudge Chocolate Pudding Cake a few hours ahead of time. Bake it, allow it to cool slightly, and keep it covered at room temperature. When ready to serve, warm individual portions in the microwave for about 15–20 seconds. This restores the soft texture and reactivates the fudgy layer without drying out the cake.
Can You Use Gluten-Free Flour In This Recipe?
Absolutely! You can substitute all-purpose flour with a gluten-free flour blend. Choose one that includes xanthan gum or add a bit separately if your blend doesn’t. The texture may be slightly different, but the rich flavor and self-saucing effect will still come through, making it a great option for those with gluten sensitivity.
Why Is Hot Water Poured On Top Before Baking?
Pouring hot water over the batter may seem strange, but it’s the key step that creates the signature fudge sauce. The hot water melts the sugar and cocoa topping, allowing it to seep to the bottom during baking. Meanwhile, the cake bakes on top. This technique forms two distinct layers: a soft, moist cake above and a warm, molten pudding beneath.
How Should You Store Leftover Hot Fudge Chocolate Pudding Cake?
To store leftovers, let the cake cool completely, then cover the dish tightly with foil or plastic wrap and refrigerate for up to 3 days. When you’re ready to enjoy it again, reheat individual servings in the microwave for 20–30 seconds. This helps restore the gooey texture and brings back the warmth that makes the cake so irresistible.
Conclusion
Hot Fudge Chocolate Pudding Cake is the kind of dessert that brings warmth, comfort, and pure indulgence to the table. Its rich, gooey fudge sauce paired with soft, moist chocolate cake makes every bite irresistible.
The beauty of this dessert lies not just in its flavor but also in its simplicity—no fancy ingredients or complicated steps, just honest homemade goodness. Whether you’re serving it fresh from the oven or reheating leftovers, it’s sure to satisfy every chocolate craving.
Perfect for family dinners, potlucks, or cozy nights in, this classic treat is a must-try for any chocolate lover. Once you make it, you’ll understand why it remains a timeless favorite in so many kitchens.