
If you’re looking for a simple, healthy way to spoil your pup, these 5 Dehydrated Dog Treat Recipes are a great place to start. Store-bought treats can be loaded with preservatives and mystery ingredients, but making your own lets you control exactly what goes into your dog’s snacks.
Dehydrated treats are especially great because they’re easy to store, last a long time, and pack a serious punch of flavor dogs love. Whether you’re working with a dehydrator or just using your oven, these recipes are straightforward and require minimal prep.
You’ll find ideas using common ingredients like sweet potatoes, chicken, and apples—no fancy stuff needed. Best of all, they’re budget-friendly and a fun way to show your dog some extra love.
So, if you’re ready to ditch the store-bought stuff and try something wholesome, these 5 Dehydrated Dog Treat Recipes will help you whip up some tail-wagging goodness in no time.
Dehydrated Dog Treat Recipes Your Pup Will Love
Making your own dog treats is a fun and rewarding way to ensure your furry friend gets healthy, natural snacks. Dehydrated dog treats are especially popular because they’re easy to make, long-lasting, and packed with nutrients.
Whether you’re a seasoned DIY dog chef or just getting started, these 5 dehydrated dog treat recipes are sure to impress your pup and give you peace of mind about what they’re munching on.
1. Homemade Chicken and Sweet Potato Jerky Recipe for Dogs
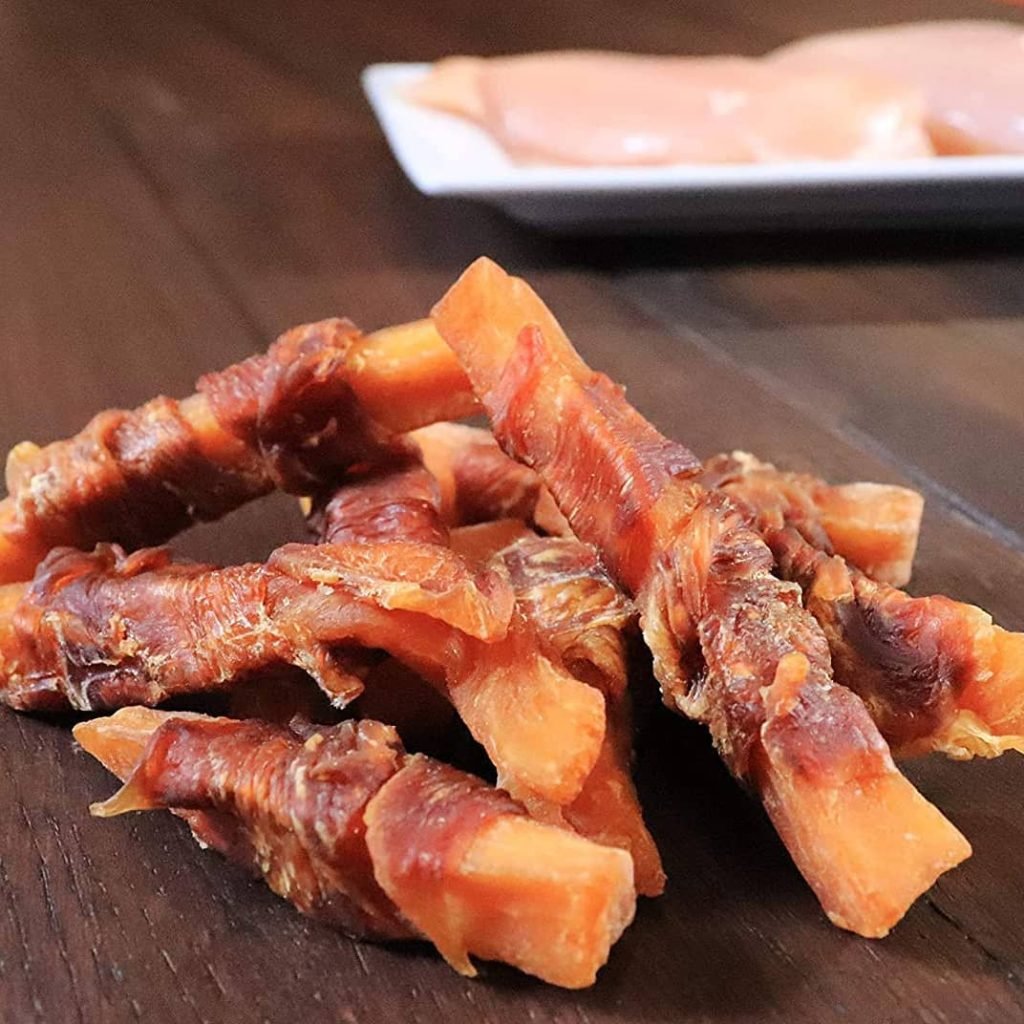
Looking for a healthy, homemade treat your pup will go crazy for? This chicken and sweet potato jerky recipe might just become your new go-to! It’s simple to make, requires only two whole-food ingredients, and delivers the kind of meaty, chewy texture dogs adore. Whether you’re avoiding preservatives, looking to save money, or just enjoy spoiling your dog with something wholesome, this DIY jerky checks all the boxes.
Chicken is a lean protein that supports strong muscles, while sweet potatoes provide a boost of fiber, vitamins, and natural sweetness. Best of all, making it yourself means no artificial flavors, fillers, or mystery ingredients. Just real food, slow-dried to perfection. Let’s get started!
What You’ll Need to Make This Recipe
Before you roll up your sleeves, make sure you have everything you need on hand. These basic tools and ingredients are likely already in your kitchen or easy to find at any grocery store.
- 2 boneless, skinless chicken breasts – A lean and protein-rich option that’s easy for dogs to digest.
- 1 large sweet potato – Packed with fiber, beta-carotene, and natural sweetness dogs enjoy.
- Sharp kitchen knife or mandoline slicer – To cut uniform, thin slices that dry evenly.
- Cutting board and prep surface – For safely preparing the raw ingredients.
- Baking sheet and parchment paper – Prevents sticking and helps everything bake consistently.
- Wire cooling rack – Essential for air circulation once the jerky is done baking.
- Optional: food dehydrator – For those who want a longer shelf life or more consistent results.
- Airtight storage container or freezer-safe bag – Keeps your treats fresh for weeks.
Tip: For cleaner cuts, place the chicken in the freezer for about 30 to 45 minutes before slicing. This firms up the meat and makes it much easier to handle.
Step-by-Step Instructions for Making the Jerky
Now that your ingredients are ready, it’s time to prep, slice, and bake. The process is simple, but attention to detail ensures safe, tasty results.
Step 1: Slice the Chicken and Sweet Potato
Start with the chicken. Using a sharp knife or mandoline slicer, cut it into long, thin strips. Aim for slices about 1/4 inch thick. This ensures even cooking and gives the jerky a nice chewy texture.
Next, move on to the sweet potato. Wash it thoroughly—there’s no need to peel it unless you prefer to. Slice it lengthwise into similar 1/4-inch thick pieces. Try to keep the sizes consistent with the chicken so everything cooks evenly.
Step 2: Arrange the Slices on Your Baking Sheet
Line your baking sheet with parchment paper or a silicone mat. This prevents the food from sticking and helps distribute heat more evenly. Lay the sweet potato and chicken strips in a single layer with enough space between them for air circulation. Don’t stack or overlap the slices—this can lead to uneven drying or undercooked spots.
If you’re working with multiple trays, rotate them halfway through baking to make sure each tray cooks uniformly.
Step 3: Bake at a Low Temperature
Preheat your oven to 200°F (93°C). This low temperature is key—it dries out the meat and sweet potatoes without burning or overcooking them.
Place the trays in the center of the oven and bake for 2.5 to 3 hours. At the halfway point, flip each slice to help both sides dry out evenly. The jerky is done when the chicken feels firm and leathery but not brittle, and the sweet potatoes are dry but still slightly bendable.
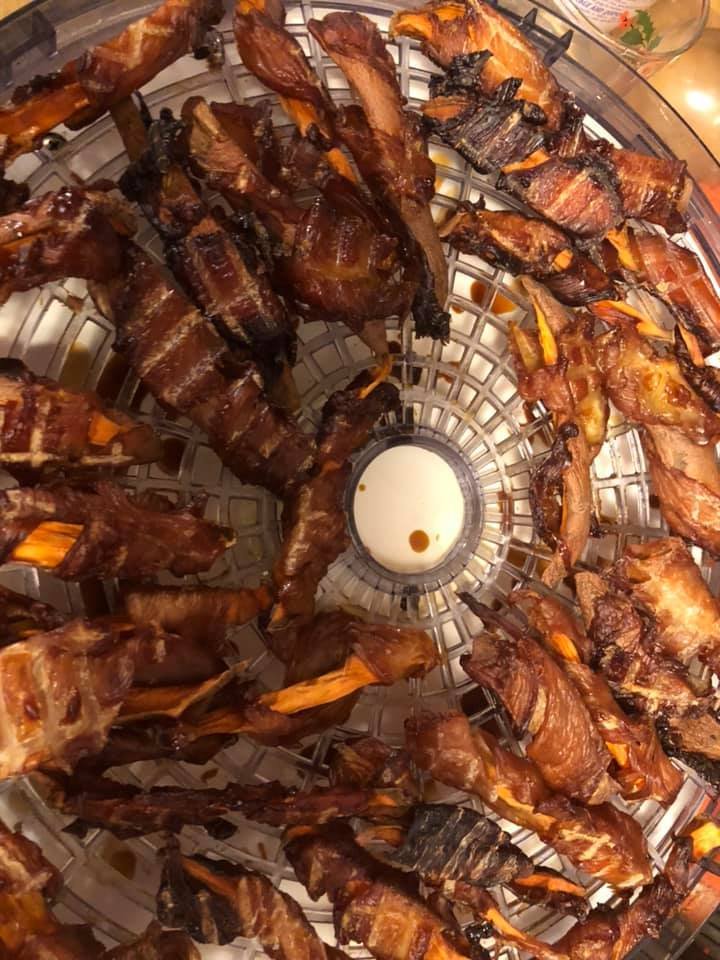
If you’re using a food dehydrator, set it to 140°F (60°C) and dry the slices for 6 to 8 hours. This method takes longer but results in a chewier, more evenly dehydrated treat with better shelf life.
Step 4: Let the Jerky Cool
Once the baking time is complete, remove the trays and transfer the slices to a wire cooling rack. Let everything cool down to room temperature. This step is important—not only does it protect your storage containers from condensation, but it also helps the jerky firm up as it cools.
Step 5: Store Properly
When completely cool, store the jerky in an airtight container or resealable bag. You can refrigerate it for up to two weeks, or freeze it for up to three months. If freezing, separate the pieces with parchment paper to prevent sticking.
To thaw frozen jerky, just leave it at room temperature for a few hours or pop it into the fridge overnight. Always inspect for signs of spoilage (like mold or an off smell) before feeding to your dog.
Helpful Tips for the Best Jerky Experience
As with any treat, moderation is key. This jerky is meant to supplement your dog’s diet—not replace meals. Because it’s high in protein and low in moisture, make sure your pup always has fresh water available after snacking.
Introduce new treats slowly. Even though this recipe uses dog-safe ingredients, each pup is different. Start with a small piece and watch for any unusual reactions. If everything goes well, you can feel good about making this a regular reward.
Want to mix things up? You can experiment with other ingredients like thin-cut apples, carrots, or lean beef. Just avoid anything toxic to dogs, such as onions, garlic, grapes, or seasoning blends.
2. Homemade Chicken and Sweet Potato Jerky for Dogs

If you’re looking to spoil your dog with a healthy, homemade treat, this Chicken and Sweet Potato Jerky recipe is just what you need. Not only is it simple to make, but it’s also full of high-quality ingredients that are great for your dog’s health. Unlike store-bought jerky, which often contains preservatives and other questionable ingredients, homemade jerky gives you full control over what your pup is eating. The lean protein from chicken, paired with the fiber and nutrients from sweet potatoes, creates a delicious and nutritious treat your dog will love.
Making jerky at home might sound complicated, but it’s easier than you think. With just a few basic ingredients and some patience, you can prepare a treat that’s as wholesome as it is tasty. These jerky pieces are perfect for training, as a snack, or just to show your dog how much you care. Ready to get started? Let’s walk through the process.
Ingredients and Supplies You’ll Need
Before you start, gather all the necessary ingredients and tools. The process is fairly simple, but having everything ready will make the preparation smoother.
- 2 boneless, skinless chicken breasts – Fresh, lean meat with no added preservatives.
- 1 large sweet potato – A nutritious source of fiber and vitamins.
- Sharp knife or mandoline slicer – To slice the chicken and sweet potato evenly.
- Cutting board – For preparing the ingredients.
- Baking sheet with parchment paper or a silicone mat – This prevents the jerky from sticking and helps with cleanup.
- Wire rack (optional but recommended) – Allows air to circulate around the jerky for more even drying.
- Oven or food dehydrator – Both work great for this recipe.
- Airtight container or freezer bags – For storing the finished jerky.
Tip: To make slicing the chicken easier, place it in the freezer for about 30 minutes before you begin. This firms up the meat, making it easier to cut into thin strips.
Step-by-Step Guide to Making Chicken and Sweet Potato Jerky
Now that you have everything you need, let’s jump into the step-by-step process of making your homemade chicken and sweet potato jerky. These steps will guide you through slicing, preparing, and drying the jerky to perfection. Patience is key here, as the jerky needs time to dehydrate, but the process is easy and totally worth it.
Step 1: Slice the Chicken and Sweet Potato
Start by slicing the chicken breasts into thin strips. Aim for about 1/4 inch thick slices. You want the strips to be thin enough to dry properly but not too thin that they become brittle. A sharp knife or a mandoline slicer can help ensure the slices are even.
Next, wash the sweet potato thoroughly. You can leave the skin on for added nutrients or peel it if you prefer. Slice the sweet potato lengthwise into 1/4-inch thick slices as well. Make sure the slices are consistent in size to ensure even drying.
Step 2: Prepare the Baking Sheet
Preheat your oven to 200°F (93°C). This low temperature ensures that the jerky dries out slowly, preserving the flavor and texture without overcooking.
Next, line a baking sheet with parchment paper or a silicone mat. If you have a wire rack, place it on top of the baking sheet, as it helps with air circulation and ensures the jerky dries evenly. Lay the chicken and sweet potato slices in a single layer without overlapping them. If they are too crowded, they won’t dry properly.
Step 3: Bake the Jerky
Place the baking sheet in the oven and bake the jerky for 2.5 to 3 hours. At the halfway point, flip the pieces to ensure both sides dry evenly. The chicken jerky should feel firm and leathery but not overly dry or brittle. The sweet potato slices will shrink as they dry, becoming a chewy texture.
If you are using a food dehydrator, set it to 140°F (60°C) and let the jerky dry for 6 to 8 hours, depending on your dehydrator’s model and the thickness of your slices.
Step 4: Cooling and Storing the Jerky
Once the jerky is finished drying, remove it from the oven or dehydrator. Let the jerky cool on a wire rack to room temperature. This cooling process helps the jerky firm up even more and prevents moisture buildup in your storage container.
After the jerky has completely cooled, store it in an airtight container or a resealable freezer bag. If you want to keep the treats fresh for a longer period, you can freeze them. They will last up to three months in the freezer and about two weeks in the refrigerator.
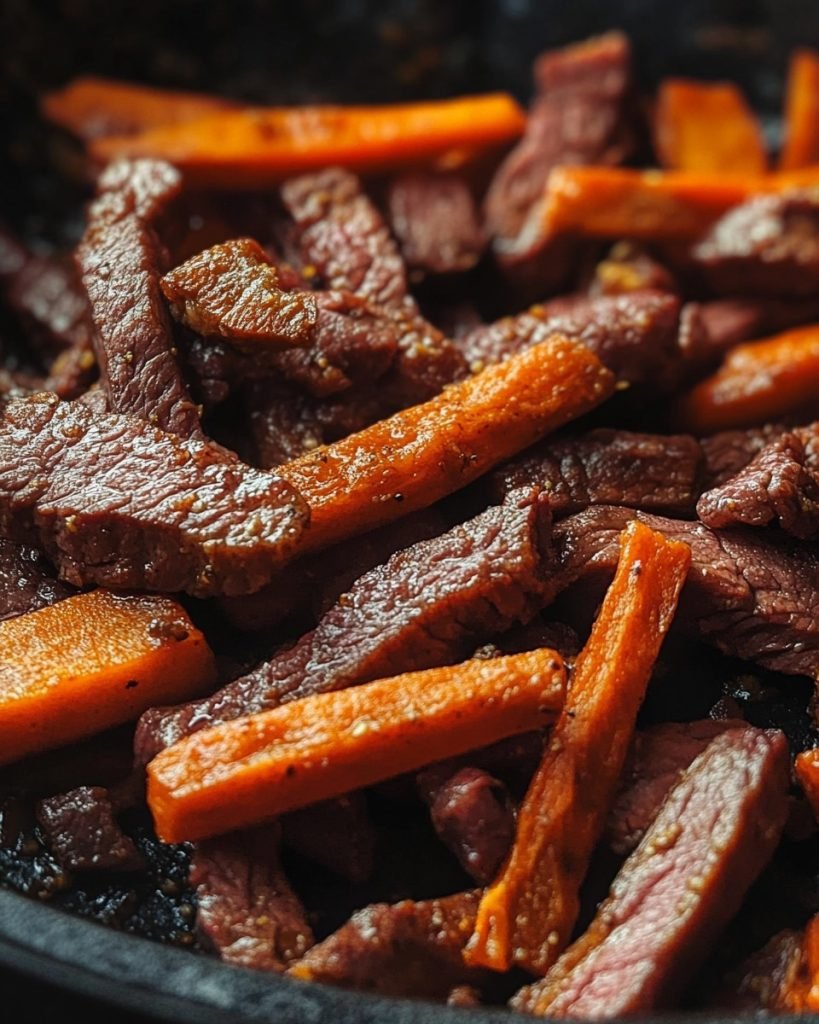
3. Beef and Carrot Sticks Recipes for Dogs
If you’re looking for a healthy, tasty snack to treat your dog, these Beef and Carrot Sticks are the perfect option. This simple, homemade recipe uses two of the most nutritious ingredients: lean beef and fresh carrots.
Full of vitamins, fiber, and protein, these treats are a great way to reward your dog while keeping them healthy. Plus, making them at home ensures you know exactly what’s going into your dog’s treats — no preservatives, additives, or mystery ingredients.
The preparation is quick and straightforward. With a little time and patience, you can create a batch of these irresistible beef and carrot sticks. These treats are not only a good snack but also a great option for training or rewarding good behavior. Let’s dive into the details and get started on making this delicious treat.
Ingredients and Supplies You’ll Need
Before you begin, it’s important to have everything ready. The recipe calls for basic ingredients and some simple tools to help make the process smoother.
- 1 lb of lean ground beef – Use lean beef to reduce the fat content and ensure a healthier treat for your dog.
- 2 medium-sized carrots – Packed with vitamins and fiber, carrots are a fantastic addition to any homemade dog treat recipe.
- 1 egg – The egg helps bind the ingredients together, ensuring the sticks hold their shape.
- 1/2 cup oat flour – This is a healthy alternative to regular flour and adds fiber to the treats.
- 1/2 cup shredded cheese (optional) – A little cheese can make the treats extra tasty, but it’s completely optional.
- Baking sheet with parchment paper – This will prevent the sticks from sticking to the baking sheet and make cleanup easy.
- Oven – You’ll need a standard oven to bake the treats and dry them to perfection.
- Cutting board and knife – To chop up the carrots finely.
Step-by-Step Guide to Making Beef and Carrot Sticks
Now that you have all your ingredients ready, let’s break down the steps for making these tasty and nutritious beef and carrot sticks. It’s an easy recipe, but it requires a bit of time to ensure everything comes out perfectly.
Step 1: Prepare the Carrots
Start by washing the carrots thoroughly. Peel them if you prefer, though leaving the skin on adds extra nutrients. Next, finely chop or grate the carrots. You want small pieces to ensure they integrate well with the beef mixture, giving your dog even-sized bites.
Step 2: Mix the Ingredients
In a large mixing bowl, combine the lean ground beef, grated carrots, and egg. Add in the oat flour and shredded cheese (if using). Use your hands or a spatula to mix the ingredients together thoroughly. The mixture should hold together but still be a little sticky. If it’s too wet, you can add a little more oat flour to get the right consistency.
Step 3: Shape the Sticks
Once the mixture is well-combined, it’s time to shape the treats. Divide the mixture into small portions and roll each portion into a long stick shape, about 4 to 6 inches long. If the mixture sticks to your hands, you can lightly flour them with oat flour or wet them to make shaping easier.
Place each stick on a baking sheet lined with parchment paper. Make sure they are spaced evenly apart to allow air circulation as they bake. You can also slightly flatten the sticks if you prefer a more biscuit-like texture.
Step 4: Bake the Treats
Preheat your oven to 350°F (175°C). Place the baking sheet in the oven and bake the beef and carrot sticks for about 20 to 25 minutes, or until they are golden brown and firm to the touch. Keep an eye on the treats toward the end of the baking time to ensure they don’t burn. The baking time might vary slightly depending on the size of the sticks and your oven.
Step 5: Cool and Store the Treats
Once the treats are done baking, remove them from the oven and allow them to cool on the baking sheet for a few minutes. After that, transfer them to a wire rack to cool completely. This cooling process ensures the treats firm up properly and helps prevent them from becoming soggy.
Once the sticks are completely cool, you can store them in an airtight container for up to one week at room temperature. For longer storage, you can freeze them, and they will last up to three months.
4. Salmon and Spinach Chews for Dogs
When it comes to nourishing your dog with wholesome, natural ingredients, nothing beats homemade treats. These Salmon and Spinach Chews are a perfect combination of healthy protein and leafy greens that are both delicious and good for your pup.
Salmon is packed with omega-3 fatty acids, which are excellent for your dog’s coat, skin, and joints. Spinach adds a dose of vitamins and minerals that contribute to overall health and well-being. Together, they create a chewy, nutrient-rich treat that your dog will love.
Making homemade chews might sound intimidating, but with just a few simple ingredients and a little patience, you can prepare a batch of treats that are far superior to anything you’d find in stores. Best of all, you’ll know exactly what’s in them, and your dog will benefit from the pure, natural ingredients. Ready to make these tasty chews? Let’s get started.
Ingredients and Supplies You’ll Need
To make these Salmon and Spinach Chews, gather the following ingredients and supplies:
- 1 can (6 oz) of wild-caught salmon – The star of the recipe, rich in omega-3 fatty acids.
- 1 cup fresh spinach – Full of vitamins, fiber, and antioxidants to promote your dog’s overall health.
- 1 large egg – Helps bind the mixture together and adds protein.
- 1/2 cup oat flour – A gluten-free alternative to regular flour that’s easy on your dog’s digestive system.
- 1/4 cup grated Parmesan cheese – Adds a savory flavor and makes the chews extra appetizing for your dog.
- 1/4 cup water or chicken broth – To help bind everything together and create the right consistency.
- Baking sheet with parchment paper – For easy cleanup and to prevent the chews from sticking.
- Oven – For baking and drying the chews to a chewy consistency.
- Food processor or blender – To finely chop the spinach and blend the mixture evenly.
Step-by-Step Guide to Making Salmon and Spinach Chews
Making these Salmon and Spinach Chews is simple and rewarding. Just follow these easy steps, and you’ll soon have a batch of nutritious, homemade chews that your dog will absolutely adore.
Step 1: Prepare the Spinach
Start by washing the fresh spinach thoroughly. Spinach can sometimes have dirt or grit, so make sure to rinse it well. After washing, finely chop the spinach into small pieces. If you have a food processor or blender, you can pulse the spinach to make it even finer, which helps ensure the chews have a smooth texture. The smaller the pieces, the better they’ll mix with the other ingredients.
Step 2: Combine the Wet Ingredients
In a large mixing bowl, combine the can of wild-caught salmon (including the liquid), egg, and water or chicken broth. Use a fork or whisk to break the salmon into smaller pieces, and make sure everything is well-combined. The moisture from the salmon and broth will help bind the mixture and create a dough-like consistency.
Step 3: Add the Dry Ingredients
Now it’s time to add the dry ingredients. Add the chopped spinach, oat flour, and grated Parmesan cheese into the bowl with the salmon mixture. Stir everything together until it forms a dough. The mixture should be thick but still slightly sticky. If it feels too wet, you can add a little more oat flour to achieve the right consistency. On the other hand, if it feels too dry, add a bit more broth or water until it’s just right.
Step 4: Shape the Chews
Preheat your oven to 350°F (175°C). Line a baking sheet with parchment paper to make cleanup easier and prevent the chews from sticking.
Take small portions of the dough and roll them into little chew-sized logs or sticks. You can also shape them into small rounds or squares, depending on what your dog prefers. The size of the chews should be appropriate for your dog’s size—just make sure they’re easy to chew and swallow. Place the shaped chews onto the prepared baking sheet, leaving a little space between each one.
Step 5: Bake the Chews
Place the baking sheet in the preheated oven and bake the chews for about 20 to 25 minutes or until they are golden brown. The chews should be firm to the touch but still chewy. If you’d like them to be a little crunchier, you can bake them a few extra minutes, but be careful not to overbake and dry them out too much.
Step 6: Cool and Store the Chews
Once the chews are baked, remove them from the oven and allow them to cool on the baking sheet for a few minutes. Then, transfer them to a wire rack to cool completely. Cooling them properly ensures that the chews become firm and that moisture doesn’t build up inside the treats, which can cause them to spoil quickly.
Once fully cooled, store the chews in an airtight container at room temperature for up to one week. For longer storage, you can freeze them, and they will stay fresh for up to three months. Just be sure to allow them to thaw before serving them to your dog.
5. Apple and Carrot Chips for Dogs
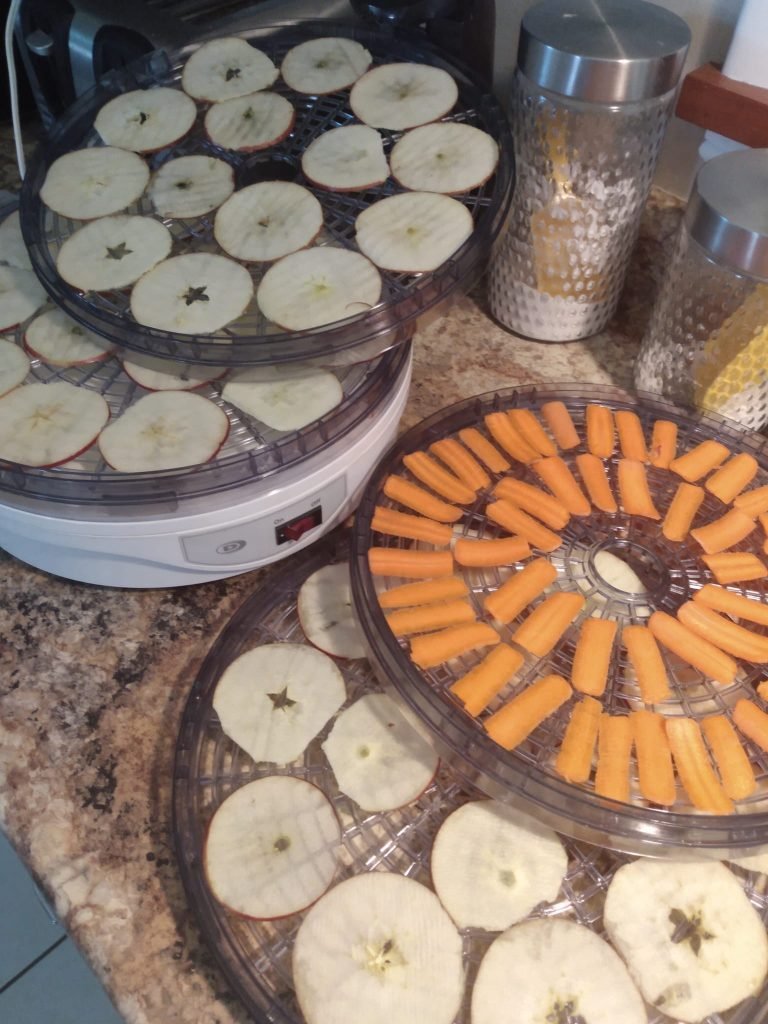
If you’re looking for a healthy, low-calorie treat for your dog, these Apple and Carrot Chips are the perfect solution. Packed with vitamins and natural sweetness, these treats are not only delicious but also provide your pup with a nutritious snack. Apples are rich in fiber, antioxidants, and vitamin C, while carrots provide beta-carotene, which is great for eye health and immune function. Together, they create a satisfying, crunchy snack your dog will love.
Making your own dog treats at home ensures you know exactly what’s in them, with no added sugars or preservatives. Plus, it’s incredibly easy to make these Apple and Carrot Chips. With just a few simple ingredients and a little time, you can create a healthy, crunchy treat that will have your dog begging for more. Let’s dive into the recipe!
Ingredients and Supplies You’ll Need
Before you start, make sure you have all the ingredients and tools ready. Here’s what you’ll need:
- 2 medium apples – Choose sweet varieties like Fuji or Gala, which are safe for dogs and provide natural sweetness.
- 2 medium carrots – Carrots are packed with nutrients and offer a satisfying crunch.
- 1 tablespoon of coconut oil – This helps to crisp up the chips and adds a healthy fat source.
- 1/2 teaspoon of cinnamon (optional) – Adds a nice flavor, but be cautious with spices as some can be harmful to dogs. Cinnamon in small amounts is safe for dogs.
- Baking sheet with parchment paper – This will prevent the chips from sticking and make cleanup easier.
- Oven – You’ll need an oven to bake and crisp the chips.
- Sharp knife or mandolin – To slice the apples and carrots thinly and evenly.
Step-by-Step Guide to Making Apple and Carrot Chips
Now that you have your ingredients ready, let’s go step by step through the process of making these tasty, crunchy Apple and Carrot Chips.
Step 1: Prepare the Apples and Carrots
Start by washing both the apples and carrots thoroughly to remove any dirt or pesticides. For the apples, slice them into thin rings or wedges, removing the seeds and core. It’s important to slice them thinly, about 1/8 inch thick, to ensure they crisp up nicely in the oven.
For the carrots, peel the skin off and then slice them into thin rounds or sticks. Aim for the same thickness as the apple slices, so they cook evenly and get crispy at the same time.
Step 2: Coat the Veggies
In a mixing bowl, combine the sliced apples and carrots. Drizzle the coconut oil over the slices, tossing everything together until the fruits and vegetables are lightly coated. If you’d like to add a little flavor, sprinkle in the cinnamon and stir again. The cinnamon will give the chips a warm, aromatic scent that your dog will love. However, cinnamon should only be used in small amounts, as too much could upset your dog’s stomach.
Step 3: Arrange on the Baking Sheet
Line a baking sheet with parchment paper to prevent the chips from sticking. Arrange the apple and carrot slices in a single layer on the baking sheet. Make sure none of the slices are overlapping, as this will prevent them from crisping evenly. If you need to, use two baking sheets to ensure there’s enough space for all the slices.
Step 4: Bake the Chips
Preheat your oven to 200°F (90°C). This low temperature will help dry out the apples and carrots slowly, making them crisp without burning. Place the baking sheet in the oven and bake for about 2 to 3 hours, checking periodically to make sure the chips aren’t getting too dark or burnt.
The baking time can vary depending on the thickness of your slices, so be patient and allow the chips to bake until they’re golden and crispy. You might need to flip them halfway through the baking time to ensure they cook evenly on both sides.
Step 5: Cool and Store the Chips
Once the chips are crispy and golden, remove them from the oven and let them cool completely on the baking sheet. This will help them firm up and finish crisping.
Once the chips have cooled, transfer them to an airtight container. These Apple and Carrot Chips will stay fresh for up to one week at room temperature. If you’d like to store them for longer, you can freeze them for up to three months. Just be sure to let them thaw completely before serving them to your dog.
Frequently Asked Questions
What Are Dehydrated Dog Treats?
Dehydrated dog treats are made by removing moisture from ingredients, preserving their nutrients and flavor while giving your dog a crunchy, healthy snack. This process helps to extend the shelf life of the treats and maintains the natural flavors of the ingredients.
Dehydrating is a great way to make homemade dog treats, ensuring they are free from preservatives and artificial ingredients.
How Do You Make Dehydrated Dog Treats at Home?
To make dehydrated dog treats at home, you’ll need a few simple ingredients, a dehydrator, and a bit of patience. Start by selecting dog-friendly ingredients like chicken, beef, sweet potatoes, or carrots. Slice the ingredients into small, even pieces, then place them in your dehydrator.
Set the dehydrator to a low temperature and let it run for several hours, checking periodically until the treats are fully dehydrated and crispy. Make sure the treats are completely dry to prevent any spoilage.
What Are the Benefits of Dehydrated Dog Treats?
Dehydrated dog treats offer several benefits for both you and your pet. They are often more nutritious than store-bought treats because you control the ingredients. They can also be easier to store and have a longer shelf life.
Dehydrating the treats preserves the nutrients while giving your dog a healthy and natural snack. Plus, many dogs love the texture and taste of these homemade treats!
Can You Dehydrate Meat for Dog Treats?
Yes, you can dehydrate meat for dog treats. Lean meats like chicken, turkey, or beef are popular choices. When dehydrating meat, make sure it’s lean and free from any added salt, seasoning, or spices, as these can be harmful to your dog.
Slice the meat into thin strips or bite-sized pieces, and place them in your dehydrator or oven at a low temperature until they are completely dry. Dehydrated meat is high in protein and makes for an excellent treat for your dog.
Are Dehydrated Dog Treats Safe for All Dogs?
Dehydrated dog treats are generally safe for most dogs, but it’s important to take your dog’s health needs into account. If your dog has food sensitivities, allergies, or any specific dietary restrictions, be sure to choose ingredients that align with their requirements.
For example, if your dog is on a low-fat diet, you might want to avoid high-fat meats. Always consult with your vet if you’re unsure about which ingredients are suitable for your dog.
Can Dehydrated Dog Treats Help with Dog Dental Health?
Yes, dehydrated dog treats can help with dental health. The crunchiness of the treats can help reduce plaque buildup on your dog’s teeth, promoting better oral hygiene. Some dehydrated treats even contain ingredients like sweet potatoes or carrots, which are natural teeth cleaners.
However, it’s important to note that these treats are not a substitute for regular brushing or dental check-ups, but they can be a helpful addition to your dog’s oral care routine.
Final Words
Dehydrated dog treats are a fantastic way to provide your pet with a healthy, tasty snack that’s free from artificial additives and preservatives. Whether you’re using lean meats, vegetables, or fruits, dehydrating treats at home ensures they are nutritious and customizable to your dog’s dietary needs.
Not only do these treats offer a satisfying crunch, but they can also promote dental health and serve as a longer-lasting snack option. With just a few simple ingredients and tools, you can create a variety of delicious homemade treats that your dog will love.
Experiment with different recipes, and enjoy watching your pet savor these wholesome, homemade delights!